OPOD - How to make a glass bead rainbow
How to Make a Glass Bead Rainbow
If you've ever marveled at the beauty of a rainbow and wondered if you could recreate it indoors, you're in luck. With the help of glass beads, you can make your very own "rainbow" display. These glass beads are commonly used on roads to enhance the reflectivity of paint markings. While some of these beads may not be perfect spheres, they still have the ability to produce stunning rainbow-like effects when properly utilized.
Glass spheres create a similar optical phenomenon to spherical raindrops. When light enters a glass bead, it undergoes internal reflection, resulting in the formation of a primary bow. The radius of this bow is approximately 21°, compared to the 42° radius of a water rainbow. This difference is due to the fact that glass refracts light more strongly than water.
Before embarking on your glass bead rainbow project, it's important to choose the right beads. Not all "road beads" are suitable for creating bows, so it's best to examine a sample under a microscope. Look for beads that are clear, round, and have a smooth surface finish. These characteristics will ensure optimal results in your display.
Creating an Indoor Glass Bead Rainbow
To create your indoor glass bead rainbow display, you'll need to mount the beads evenly and smoothly on a board or cloth. Additionally, you'll need a very bright and small light source to illuminate the beads. There are two approaches you can take:
-
Robert Greenler's Method: Greenler, the author of "Rainbows Halos and Glories," recommends using "spray adhesive" to attach the glass beads to a black cardboard or cloth surface. Apply the adhesive in an east-west and north-south pattern to ensure complete coverage, then sprinkle the glass beads over the surface using a salt shaker. By tilting the surface in different directions before the adhesive dries, you can achieve a more uniform coverage. To showcase the rainbow to people in different parts of a room, walk across the front of the room with a light source that illuminates the entire surface.
-
Charles Monkhouse's Method: Monkhouse suggests using 3M Photo Mount to mount the beads. Start by painting the surface with matte black emulsion, then spray it with spray mount according to the instructions on the tin. Sprinkle the beads onto the surface using a sieve or other controlled flow method, ensuring an even distribution. After allowing it to dry for an hour, shake off any surplus beads and repeat the process with another layer of Photo Mount and beads. Finally, hang the display and avoid touching the surface.
Obtaining Glass Beads
Glass beads can be obtained from local road repair depots or ordered directly from manufacturers. Before investing time and effort into creating your bow, it's essential to check the quality of the beads. Ensuring that they meet the necessary criteria of clarity, roundness, and smoothness will significantly impact the success of your display.
The Beauty of Your Own Indoor Rainbow
Creating your own glass bead rainbow requires patience and experimentation, but the rewards are well worth it. The ability to witness a rainbow-like phenomenon indoors, especially with a nearby hand-held lamp, is a truly captivating experience. Contrary to the notion that recreating a rainbow diminishes its charm, it actually deepens our awe, appreciation, and understanding of nature's wonders.
So why not embark on your own glass bead rainbow project today? With a few simple materials and some creativity, you can bring the beauty of a rainbow into your own home. Whether you choose to follow Robert Greenler's or Charles Monkhouse's method, remember to have fun and enjoy the process of creating your very own indoor rainbow display.
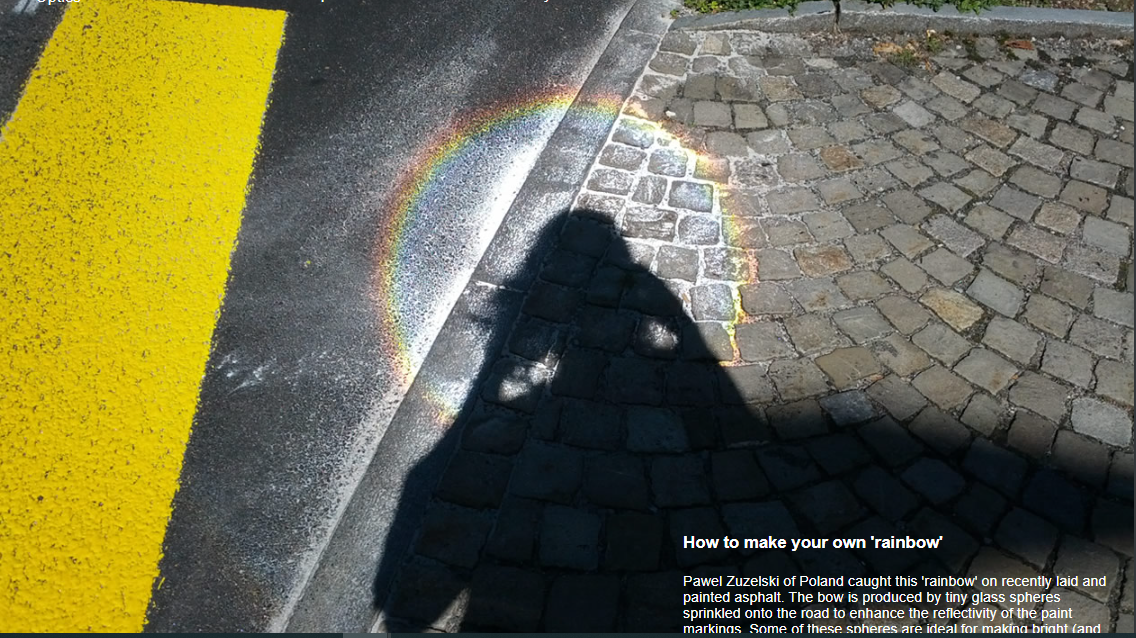
How to make your own 'rainbow'
Pawel Zuzelski of Poland caught this 'rainbow' on recently laid and painted asphalt. The bow is produced by tiny glass spheres sprinkled onto the road to enhance the reflectivity of the paint markings. Some of these spheres are ideal for making bright (and dry!) indoor bows. Image ©Pawel Zuzelski, shown with permission.
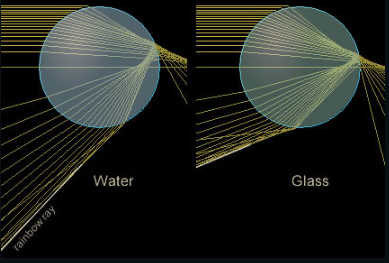
Glass spheres make 'rainbows' in the same way as spherical raindrops. Light internally reflected once produces a primary bow. Its radius is only ~21° compared to the 42° of a water rainbow because glass refracts light more strongly than water.
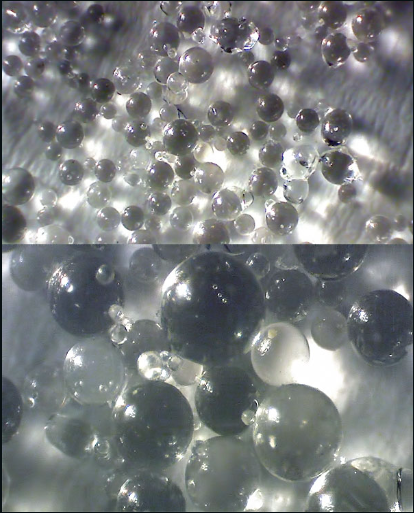
Glass beads used on roads put under the microscope by Monika Landy-Gyebnar of Hungary. These beads are of variable transparency and some are not quite spherical. Not all 'road beads' make good bows and it is best to look at a sample under a microscope. Look for clarity, roundness and smooth surface finish.
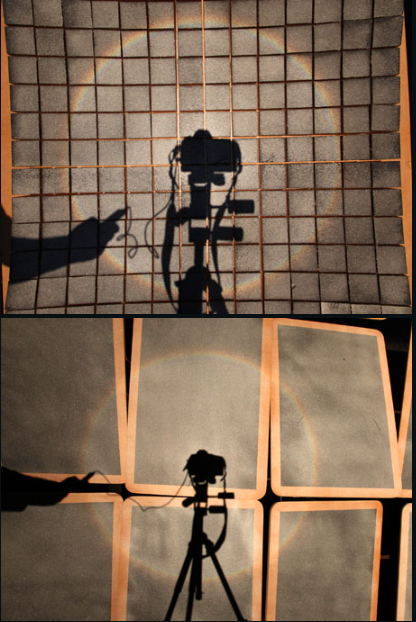
Below: Exhibits using glass beads by Charles Monkhouse at an exhibition 'Seeing the Light, an investigation into Brocken Spectres and Heiligenschein' late 2011 in Gainsborough, England.
 Recipes
To make an indoor glass bead bow display you need to mount the beads evenly and smoothly on a board or cloth. Then it should be illuminated by very bright and small light. Here are two approaches:
Robert Greenler, author of the classic book "Rainbows Halos and Glories", has sent this account for OPOD readers:
"...The glass-bead display can be made to work more easily .than an indoor water spray.. The glass beads used in road markings will work well. I have used "spray adhesive" to attach them to either black cardboard or cloth. The adhesive comes in aerosol spray cans and is available from several manufacturers. I spray the surface in an east-west pattern and then in a north-south pattern to get complete coverage and then sprinkle the glass beads over the surface with a big salt shaker. if you tilt the surface in different directions before the adhesive dries you can roll the loose beads around to make the coverage more uniform.
At one time I used a bead-coated cloth of dimension 3 meter x 3 meter in the front of a lecture room that seated 250 people. To show the rainbow to people in different parts of the room I walked across the front of the room--between the screen and the audience--with a light that illuminated the entire screen. People who were on a line between me and the screen could see the bow. How close the source should be to the screen depends on how far away the observer is--and can be determined by trial. The light that I used was a replacement bulb (with the build-in reflector) for a 35 mm slide projector. Here 35 mm slide projectors are now an endangered species.
Another (more hands-on) very simple demo consists of a shallow box (perhaps 30 cm on a side) with a black bottom, and a clear plastic top. Put in some of the glass beads and tape up all of the seams so that the beads can't be spilled from the box. Shake the box to distribute the beads across the bottom and view the beads with a small light source held between observer and box.
The light source that I used was the bare bulb of a small "Maglite" flashlight. Now you would probably use an LED. You want a single small source, without a back reflector. Whatever the arrangement you want the light from the source to illuminate the entire layers of beads. You want to let the viewer play with the light and move it toward and away from the surface to see the rainbow change in size. I think the "participation" is necessary to make this demo interesting. At a table you could have several of these boxes and lights to accommodate several viewers at the same time.
There are subtleties to both of the demos .water drops and glass beads.: In Nature's rainbow, the light source is at a great distance, with the result that the angular size of the rainbow does not change with the distance of the raindrops from the observer; the angular size of a rainbow in the spray of a hand-held hose is the same as that produced by a sheet of rain a kilometer away. In these .glass bead. demos, with the light source between observer and beads, the angular size of bow does vary with distance.
Good luck with your efforts."
Charles Monkhouse has produced impressive artwork (1,2,3) employing glass bead bows and offers this advice:
"In the end .to mount the beads. we settled for 3M Photo Mount. It's worked for this exhibition over a couple of weeks but I noticed that in the stuff I did earlier in the summer the glass beads had dulled. We had to scraped them off and start again. So ultimately we are also looking for a more permanent solution. But if a few weeks will suffice this was the process:
Paint with matte black emulsion
Spray with spray mount as per instruction on tin
Sprinkle on beads (tricky getting an even surface - we used a couple of sieves inside each other with gaffer tape between to control the flow, and then poured the beads from a mug, into the sieve while shaking)
Leave an hour.
Tip up and shake off surplus.
Repeat with another layer of Photo Mount and beads.
Shake again and hang.
Don't let anybody touch the surface!
We used the spray liberally - 10 cans over 15 sq meters. Incidentally we used 650w Fresnel spots for the studies and a 2000w profile spot for the Rood screen."
Glass beads can be begged from a local road repair depot or ordered direct from manufacturers. Do check their quality before investing bow-making effort. For illumination, try a small bright halogen bulb for the close-up experiemnts that Robert Greenler suggests. More distant light sources should be small and very bright indeed.
Patience and experiments are needed but the rewards of your own indoor rainbow, especially those from a nearby hand-held lamp are great. Contrary to the oft quoted (and misquoted) Lamia poem of Mr Keats, "unweaving (and having your own tame) rainbow" does not destroy the charms of those of the sky nor dim them with cold philosophy. Rather it deepens our awe, appreciation and understanding of Nature's wonders.
Make a bow today!
Note: this article has been automatically converted from the old site and may not appear as intended. You can find the original article here.
Reference Atmospheric Optics
If you use any of the definitions, information, or data presented on Atmospheric Optics, please copy the link or reference below to properly credit us as the reference source. Thank you!
-
<a href="https://atoptics.co.uk/blog/opod-how-to-make-a-glass-bead-rainbow/">OPOD - How to make a glass bead rainbow</a>
-
"OPOD - How to make a glass bead rainbow". Atmospheric Optics. Accessed on April 24, 2024. https://atoptics.co.uk/blog/opod-how-to-make-a-glass-bead-rainbow/.
-
"OPOD - How to make a glass bead rainbow". Atmospheric Optics, https://atoptics.co.uk/blog/opod-how-to-make-a-glass-bead-rainbow/. Accessed 24 April, 2024
-
OPOD - How to make a glass bead rainbow. Atmospheric Optics. Retrieved from https://atoptics.co.uk/blog/opod-how-to-make-a-glass-bead-rainbow/.